A LAMP battery is a set of four different software technologies that developers use to build websites and web applications. LAMP is an acronym for the operating system Linux, the web server Apache, the database server MySQL and the programming language PHP, in some other variants of this stack, Perl is used instead of PHP either PythonThese four technologies are open source, meaning they are maintained by the community and freely available for anyone to use. Developers use LAMP stacks to create, host, and maintain web content.
He LAMP server consists of Linux, Apache, MySQL/MariaDB and PHP. Here are the steps to install and configure the entire environment, including phpMyAdmin, so you can host web pages for the framework of WordPress, Joomla, Drupal.
LAMP It is a word that is well known in the world of web hosting, web development and design, it is also known as "LAMP server" or "LAMP stack"
What is a LAMP server?
A LAMP server is a software stack composed of four main technologies that work together to host and run dynamic web applications:
- Linux: The operating system.
- Apache: The web server that delivers pages to the browser.
- MySQL/MariaDB: The database management system.
- PHP: The programming language for processing dynamic content.
- phpMyAdmin: Web-based administration tool for managing MySQL or MariaDB databases.
What is a LAMP server used for?
A LAMP server It serves as the foundation for hosting and running dynamic web applications. This type of server is widely used in web development thanks to its flexible, open-source architecture and compatibility with a wide variety of projects.
A LAMP server provides a complete environment for developing, testing, and hosting dynamic websites and web applications. The combination of technologies allows for processing dynamic content, managing databases, and delivering web pages to users.
What is a LAMP server used for?
A. Dynamic Website Hosting
- It is ideal for running content management systems such as WordPress, Joomla either Drupal.
- It allows you to create websites with customizable content, blogs, online stores, or information portals.
B. Development and testing of web applications
- It is perfect for developers working on PHP-based projects.
- Provides a local environment for developing and debugging applications before putting them into production.
C. Database management
- Provides tools (such as phpMyAdmin) to manage databases visually or using SQL commands.
D. Task automation
- It can be used to run scripts that interact with the database, manage files, or send notifications.
E. Custom Applications
- Used in custom-made applications for companies, such as internal systems, intranets, or CRMs.
What is Apache?

Apache HTTP Server (commonly known as Apache) is an open-source web server software that allows users to host and deliver web content over the Internet. It is one of the most widely used servers in the world due to its robustness, flexibility, and ability to handle both simple and complex applications.
Main features of Apache
- Open source and free: Available to everyone under the Apache license, at no cost.
- Compatible with multiple platforms: It works on operating systems such as Linux, Windows and macOS.
- Modularity: Its module-based architecture allows you to add or remove features as needed, such as support for PHP, SSL, compression, and more.
- Extensibility: Supports scripting languages such as PHP, Python, Perl, among others.
- Support for Virtual Hosts: Allows you to host multiple websites on a single server.
- Security: Provides support for HTTPS and advanced permissions and authentication settings.
How does Apache work?
- Receiving applications: Apache receives HTTP requests from web browsers, for example, when someone types
www.ejemplo.com. - ProsecutionThe server interprets these requests, searches for the appropriate files on the system, and processes them. If it includes scripts (such as PHP), it also executes them.
- Answer: Returns content (HTML, CSS, images, etc.) to the client browser, which renders it as a web page.
Main uses of Apache
- Website hostingFrom simple blogs to complex applications.
- Dynamic applications: Supports languages like PHP for applications like WordPress, Drupal or Joomla.
- Development server: Used by developers to test applications before putting them into production.
- Proxy server: It can act as an intermediary for other applications or servers.
Advantages of Apache
- Great support community and abundant documentation.
- Compatible with a wide variety of applications and technologies.
- Stability and proven performance in production environments.
- Customizable configuration to suit any need
Install Apache server
$ sudo apt install apache2 apache2-doc
Real-time Apache monitoring tool.
$ sudo apt install apachetop
Check service status
Make sure Apache is running and enabled to start automatically at system startup:
$ sudo systemctl status apache2
Enable Apache at system startup: To have Apache start automatically when the server is turned on:
$ sudo systemctl enable apache2
Basic commands to manage Apache
Disable Apache at startup: If you don't want Apache to start automatically:
$ sudo systemctl disable apache2
Start Apache: : Enable Apache if it is stopped:
$ sudo systemctl start apache2
Stop Apache: : Terminate Apache service:
$ sudo systemctl stop apache2
Restart Apache: : Restart Apache completely (useful after major configuration changes):
$ sudo systemctl restart apache2
Reload configuration: Reloads configuration files without interrupting active connections:
$ sudo systemctl reload apache2
Check Apache Status: Displays information about whether Apache is running and other details:
$ sudo systemctl status apache2
Test the installation Apache:
Open your web browser and visit: http://127.0.0.0/

What is PHP?
PHP PHP is a server-side programming language designed for web development. It is widely used to create dynamic and interactive web pages. When run on the server, PHP generates content that is then delivered to the user's browser in HTML format.
Main features of PHP
- Open source and free: It's accessible to anyone and has a great support community.
- Ease of learning: Its syntax is simple, making it ideal for beginners.
- Integration with databases: It supports a wide range of systems, such as MySQL, PostgreSQL, and SQLite.
- Compatible with HTML and CSS: It can be embedded directly into the HTML code.
- Multi-platform support: Works on Linux, Windows and macOS servers.
- Scalability: It is used in both small projects and complex applications such as WordPress, Facebook or Wikipedia.
What is PHP used for?
- Development of dynamic web applications:
- Contact forms.
- Registration and authentication systems.
- Applications that interact with databases.
- Content management systems (CMS):
- Platforms such as WordPress, Joomla either Drupal They are based on PHP.
- Dynamic content generation:
- Create custom pages based on user data or a database.
- Automating tasks on the server:
- Send emails.
- Process files uploaded by users.
- Web Services and APIs:
- PHP can generate responses in formats such as JSON or XML for external applications.
Advantages of using PHP
- Extensive support and documentation: Thanks to its popularity, it is easy to find solutions and resources.
- Compatible with popular technologies: Works well with web servers like Apache or Nginx.
- Efficiency and flexibility: Ideal for small scripts and large business projects.
- Large number of frameworks: Like Laravel, Symfony, CodeIgniter and Zend Framework, which simplify development.
Install PHP 8.2 (Default version Debian 12)
$ sudo apt install php libapache2-mod-php php-mysql php-cli php-curl php-gd php-mbstring php-xml php-zip php-json php-readline
Restart Apache to apply the changes:
$ sudo systemctl restart apache2
Basic configuration
Create a file index.php in the root directory of the web server (/var/www/html) and add the following content to test that PHP works:
<?php
phpinfo();
?>
$ sudo nano /var/www/html/index.php
Access to http://localhost/index.php in your browser. If you see detailed information about PHP, it's working correctly.

What is MariaDB?

MariaDB MariaDB is an open-source relational database management system derived from MySQL. It was created by the original MySQL developers as an alternative after Oracle acquired MySQL. MariaDB is fully compatible with MySQL in terms of commands, configurations, and structure, making migration between the two systems easy.
Main features of MariaDB
What is MariaDB used for?
- Web databases: It is popular in applications such as WordPress, Joomla and Drupal.
- Business applications: Used to store large volumes of data.
- Embedded systems: Due to its efficiency and small size.
- Database clusters: For high availability and fault tolerance.
Advantages of using MariaDB
- Superior performance: Faster in some complex operations.
- Flexibility: Compatible with a variety of storage engines such as InnoDB, Aria, and TokuDB.
- Support for JSON and advanced features: Useful for modern applications.
- Clustering and replication: Facilitates high availability.
Installing MariaDB on Debian 12
$ sudo apt install mariadb-server mariadb-client
Check the installation:
Check that MariaDB is installed correctly and working:
$ sudo systemctl status mariadb
Enable autostart:
$ sudo systemctl enable mariadb
Basic MariaDB Configuration
Set up MariaDB in an environment LAMP (Linux, Apache, MariaDB, and PHP) is essential for creating dynamic database-driven applications. Below, I'll detail the steps to install and configure MariaDB as part of a LAMP server in Debian 12.
- Secure the installation: Run the security script to set passwords and remove unnecessary access:
$ sudo mysql_secure_installation
You will be asked:
- Set a password for the root user.
- Remove anonymous users.
- Disable remote access for the root user.
- Delete the test database.
NOTE: RUNNING ALL PARTS OF THIS SCRIPT IS RECOMMENDED FOR ALL MariaDB
      SERVERS IN PRODUCTION USE!  PLEASE READ EACH STEP CAREFULLY!

In order to log into MariaDB to secure it, we'll need the current
password for the root user. If you've just installed MariaDB, and
haven't set the root password yet, you should just press enter here.

Enter current password for root (enter for none):
OK, successfully used password, moving on...

Setting the root password or using the unix_socket ensures that nobody
can log into the MariaDB root user without the proper authorisation.

You already have your root account protected, so you can safely answer 'n'.

Switch to unix_socket authentication [Y/n] n
 ... skipping.

You already have your root account protected, so you can safely answer 'n'.

Change the root password? [Y/n] n
 ... skipping.

By default, a MariaDB installation has an anonymous user, allowing anyone
to log into MariaDB without having to have a user account created for
them.  This is intended only for testing, and to make the installation
go a bit smoother.  You should remove them before moving into a
production environment.

Remove anonymous users? [Y/n] y
 ... Success!

Normally, root should only be allowed to connect from 'localhost'.  This
ensures that someone cannot guess at the root password from the network.

Disallow root login remotely? [Y/n] y
 ... Success!

By default, MariaDB comes with a database named 'test' that anyone can
access.  This is also intended only for testing, and should be removed
before moving into a production environment.

Remove test database and access to it? [Y/n] y
 - Dropping test database...
 ... Success!
 - Removing privileges on test database...
 ... Success!

Reloading the privilege tables will ensure that all changes made so far
will take effect immediately.

Reload privilege tables now? [Y/n] y
 ... Success!

Cleaning up...

All done!  If you've completed all of the above steps, your MariaDB
installation should now be secure.

Thanks for using MariaDB!
Create a database and a user
- Access the MariaDB console:
$ sudo mysql -u root -p
Welcome to the MariaDB monitor.  Commands end with ; or \g.
Your MariaDB connection id is 41
Server version: 10.11.9-MariaDB-0+deb12u1 Debian 12

Copyright (c) 2000, 2018, Oracle, MariaDB Corporation Ab and others.

Type 'help;' or '\h' for help. Type '\c' to clear the current input statement.

MariaDB [(none)]>
Create a database for your application (e.g., WordPress):
MariaDB [(none)]> CREATE DATABASE wordpress_db;
Query OK, 1 row affected (0,001 sec)
Create a user with specific permissions:
CREATE USER 'javier02'@'localhost' IDENTIFIED BY 'tucontraseña';
GRANT ALL PRIVILEGES ON wordpress_db.* TO 'javier02'@'localhost';
FLUSH PRIVILEGES;
MariaDB [(none)]> CREATE USER 'javier02'@'localhost' IDENTIFIED BY '**********';
Query OK, 0 rows affected (0,013 sec)

MariaDB [(none)]> GRANT ALL PRIVILEGES ON wordpress_db.* TO 'javier02'@'localhost';
Query OK, 0 rows affected (0,002 sec)

MariaDB [(none)]> FLUSH PRIVILEGES;
Query OK, 0 rows affected (0,001 sec)
Exit MariaDB:
EXIT;
Bye
Test the connection
Close the MariaDB console and test the connection with the credentials:
mysql -u javier02 -p
Welcome to the MariaDB monitor.  Commands end with ; or \g.
Your MariaDB connection id is 63
Server version: 10.11.9-MariaDB-0+deb12u1 Debian 12

Copyright (c) 2000, 2018, Oracle, MariaDB Corporation Ab and others.

Type 'help;' or '\h' for help. Type '\c' to clear the current input statement.

MariaDB [(none)]> EXIT;
What is phpMyAdmin?
phpMyAdmin is a web-based database management tool that allows you to manage MariaDB and MySQL through a graphical interface. It is ideal for tasks such as:
- Create, modify, or delete databases, tables, and records.
- Execute SQL queries.
- Manage users and permissions.
- Back up and restore databases.
Installing and configuring phpMyAdmin on a LAMP server
1. Install phpMyAdmin
$ sudo apt install phpmyadmin
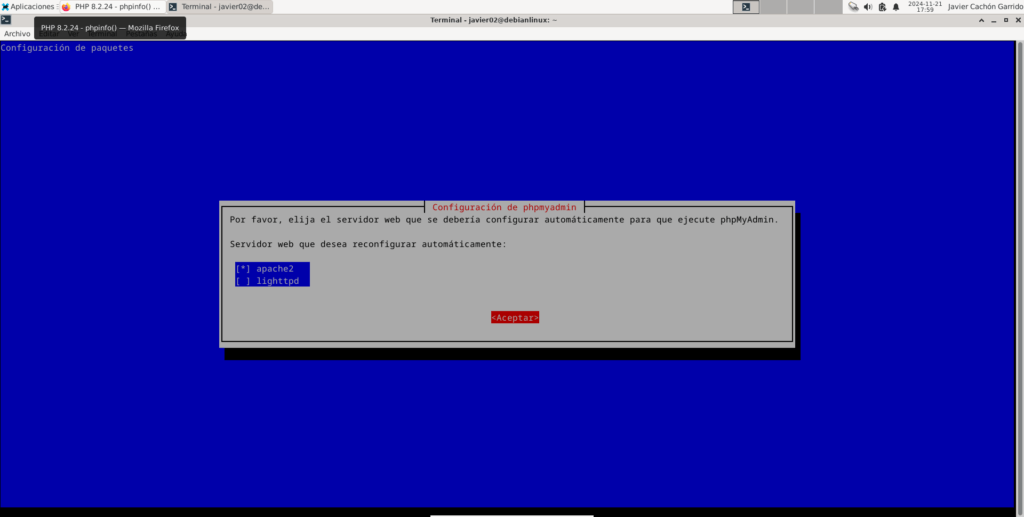
Select web server: During installation, you will be asked to choose a web server. Select Apache2 and press Enter.
Configure the database for phpMyAdmin: Select "Yes" when asked if you want to configure phpMyAdmin with dbconfig-common. Then, enter the password for the user phpmyadmin.


Configure Apache for phpMyAdmin
- Enable phpMyAdmin configuration in Apache: If the installer doesn't configure it automatically, you can create a symbolic link manually:
$ sudo ln -s /usr/share/phpmyadmin /var/www/html/phpmyadmin
Restart Apache:
$ sudo systemctl restart apache2
Access phpMyAdmin: Open in your browser: http://localhost/phpmyadmin


What is WordPress?

WordPress is a content management system, CMS It allows you to easily create and manage websites without the need for advanced programming knowledge. It was launched in 2003 and is currently one of the most popular platforms for developing websites, from personal blogs to online stores.
WordPress is one of the most popular content management systems (CMS) in the world. If you already have a LAMP server configured with Apache, MariaDB, and PHP, you're ready to install WordPress.
Main features of WordPress
- Open source: It's free and open source, meaning anyone can download, use, and modify it to suit their needs.
- Intuitive interface: It has a user-friendly interface that makes it easy to create, edit, and manage content such as pages, posts, and media.
- Personalization:
- Topics: Pre-designed templates that make it easy to change the look of your site.
- Plugins: Extensions that add functionality, such as contact forms, galleries, or e-commerce systems.
- Scalability: WordPress can be used for small blogs, corporate sites, portfolios, or large online stores.
- SEO Optimization: It offers tools to improve search engine optimization (SEO) in a simple way.
- Great community: Being so popular, it has a large community of developers and users who generate tutorials, forums, and support.
How does WordPress work?
WordPress uses an environment LAMP (Linux, Apache, MariaDB/MySQL, and PHP) to work. Here's the basic process:
- User interface: Administrators manage content and settings from the control panel.
- Database: Site information (such as posts, users, and settings) is stored in a database (MariaDB or MySQL).
- Themes and plugins: The appearance and functionality of the site are defined by themes and plugins.
- PHP Engine: WordPress uses PHP to generate dynamic pages in real time based on user requests.
Types of websites you can create with WordPress
- Blogs: Ideal for regular posts such as articles or news.
- Corporate sites: Perfect for businesses that need an online presence.
- Briefcase: For designers, photographers or artists who want to showcase their work.
- Online stores: With the WooCommerce plugin, you can create a complete e-commerce site.
- Forums and communities: With plugins like bbPress or BuddyPress.
- Online courses: Using learning plugins like LearnDash.
Advantages of using WordPress
- Ease of use.
- Flexibility and scalability.
- Lots of free resources (themes and plugins).
- Active community and constant support.
Is WordPress for you?
If you are looking for a solution to create a website of any kind, WordPress It's probably an excellent choice. It combines ease of use with tremendous customization capabilities, making it ideal for both beginners and advanced developers.
In order for Apache to work correctly and be able to serve content from the directory /var/www/html, it is important to set the permissions and ownership of this directory appropriately.
Configure permissions and ownership
Set owner and group
- Change the owner of the directory and its contents to
www-data:
$ sudo chown -R www-data:www-data /var/www/html
This ensures that Apache has full control over the files.
Set directory permissions
- Make sure that the directories inside
/var/www/htmlhave correct permissions (read, write, and execute for the owner, and only read and execute for others):
$ sudo find /var/www/html -type d -exec chmod 755 {} \;
Set file permissions
- Set file permissions (read and write for the owner, and read-only for others):
$ sudo find /var/www/html -type f -exec chmod 644 {} \;
With these steps, your directory /var/www/html will be configured correctly, and Apache will be able to serve the files securely.
Download WordPress
- Change to the Apache web directory:
$ cd /var/www/html
Download the latest version of WordPress: https://es.wordpress.org/download/
Move the wordpress*.zip file to the /var/www/html/ path
$ sudo mv wordpress*.zip /var/www/html/
Change to directory /var/www/html Extract the ZIP file using the command unzip to extract the file:
$ cd /var/www/html/
$ sudo unzip wordpress*.zip
This will extract the contents into the same directory /var/www/html
Configure WordPress
- Copy the default configuration file
$ sudo cp /var/www/html/wordpress/wp-config-sample.php /var/www/html/wordpress/wp-config.php
Edit the file wp-config.php:
$ sudo nano /var/www/html/wordpress/wp-config.php
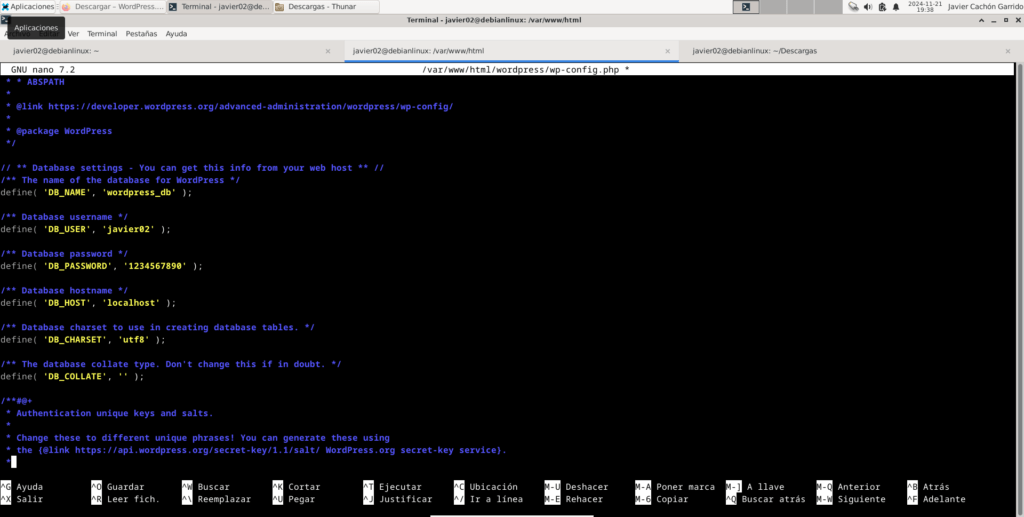
Configure the database details:
define( 'DB_NAME', 'basedatos_db' );
define( 'DB_USER', 'wp_usuario' );
define( 'DB_PASSWORD', 'tucontraseña' );
define( 'DB_HOST', 'localhost' );
Save and close the file.
Create a configuration file for your WordPress site
Create a new configuration file in the Apache sites directory:
$ sudo nano /etc/apache2/sites-available/wordpress.conf
Add the following basic configuration:
<VirtualHost *:80>
    ServerName tu-dominio.com
    ServerAlias www.tu-dominio.com
    DocumentRoot /var/www/html/wordpress

    <Directory /var/www/html/wordpress>
        Options Indexes FollowSymLinks
        AllowOverride All
        Require all granted
    </Directory>

    ErrorLog ${APACHE_LOG_DIR}/wordpress_error.log
    CustomLog ${APACHE_LOG_DIR}/wordpress_access.log combined
</VirtualHost>
- Change
tu-dominio.comby your domain or IP address127.0.0.0If you are working locally, you can uselocalhost. - Save the file and exit the editor (
CTRL + O, thenCTRL + X)
<VirtualHost *:80>
    ServerName localhost
    ServerAlias localhost
    DocumentRoot /var/www/html/wordpress

    <Directory /var/www/html/wordpress>
        Options Indexes FollowSymLinks
        AllowOverride All
        Require all granted
    </Directory>

    ErrorLog ${APACHE_LOG_DIR}/wordpress_error.log
    CustomLog ${APACHE_LOG_DIR}/wordpress_access.log combined
</VirtualHost>
Enable the site and module rewrite from Apache
- Enable the WordPress site:
$ sudo a2ensite wordpress

Enabling site wordpress.
To activate the new configuration, you need to run:
  systemctl reload apache2
Enable the module rewrite, required for WordPress permalinks:
$ sudo a2enmod rewrite

Enabling module rewrite.
To activate the new configuration, you need to run:
  systemctl restart apache2
Reload Apache configuration:
$ sudo systemctl reload apache2
Configure WordPress Directory Permissions
Make sure the permissions and ownership of the directory /var/www/html/wordpress are correct:
$ sudo chown -R www-data:www-data /var/www/html/wordpress
$ sudo find /var/www/html/wordpress -type d -exec chmod 755 {} \;
$ sudo find /var/www/html/wordpress -type f -exec chmod 644 {} \;
Enable HTTPS (optional but recommended)
If you have a domain and want to use HTTPS, you can set up a free SSL certificate with Certbot and Let's Encrypt:
- Install Certbot:
$ sudo apt install certbot python3-certbot-apache
Get an SSL certificate and automatically configure Apache:
$ sudo certbot --apache
Follow the instructions to enable HTTPS.
Verify that the certificate is configured correctly:
$ sudo certbot certificates
Set up auto-renewal:
$ sudo systemctl enable certbot.timer
Set up .htaccess in WordPress
WordPress uses the file .htaccess to manage permalinks. Make sure the file is editable:
- If it does not exist, create a file
.htaccessin the WordPress root directory:
$ ls -a /var/www/html/wordpress/
$ sudo nano /var/www/html/wordpress/.htaccess
Make sure Apache allows the use of .htaccess with the directive AllowOverride All in the site configuration file.
How to configure AllowOverride All in Apache?
Site configuration files are usually located at:
/etc/apache2/sites-available/
$ ls /etc/apache2/sites-available/
000-default.conf  default-ssl.conf  wordpress.conf
The site is called wordpress.conf
$ sudo nano /etc/apache2/sites-available/wordpress.conf
Modify the section <Directory>.
Make sure the block <Directory> that points to your site's root directory has the directive AllowOverride All.
<Directory /var/www/html/wordpress>
    Options Indexes FollowSymLinks
    AllowOverride All
    Require all granted
</Directory>
Test the configuration
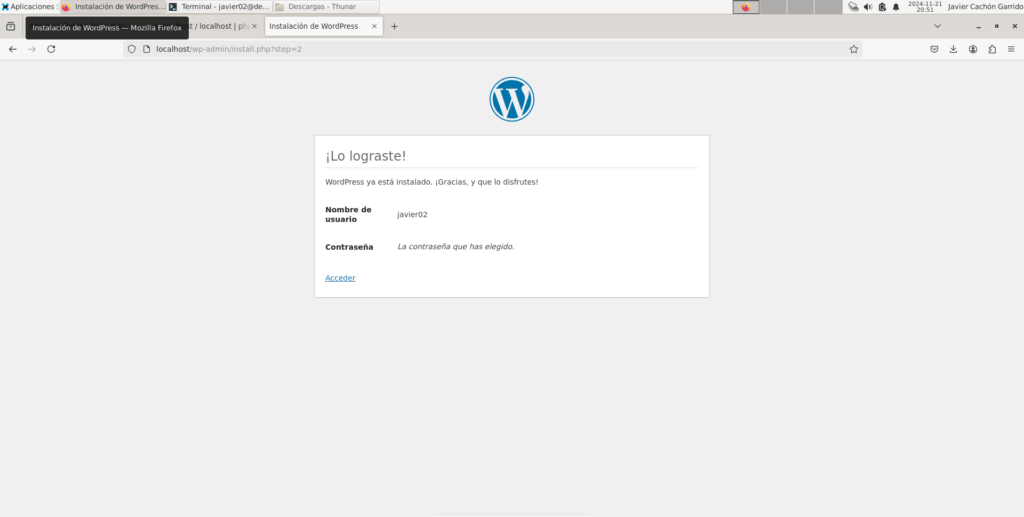
- Open your browser and visit your domain or IP address (for example,
http://tu-dominio.comeitherhttp://localhost). - If WordPress displays its installation page, you're all set! Follow the instructions to complete the setup.


Congratulations on setting up your server! LAMP on Debian Linux!
With these steps, you'll have a functional LAMP server on Debian 12. This environment is ideal for installing web applications like WordPress, Joomla, or any PHP-based software. It's a powerful and versatile solution!

Descubre más desde javiercachon.com
Subscribe to get the latest posts sent to your email.